Friday, June 26, 2009

Google Voice gives you phone number, voicemail, based on Grand Central

Google Voice is going to be officially released pretty soon now. Being based on Grand Central’s technology, the company that Google acquired back in 2007, the Voice service will offer its users a phone number and a lot of interesting features. Google Voice is able to route calls to other phone numbers, features a voicemail service, accessible directly from your phone or browser, that also allows archiving just like GMail, but for audio messages.

Grand Central users have been able to test the service as of March and they enjoyed the automatic message transcription and free SMS delivery. The service is able to transcript voice conversations into text and email them to the user, but the messages are also searchable in the archives. Some of the features are revolutionary and it seems like they’ll grab a big piece of the market share.

Until now, Google acquired over 1 million phone numbers and now they are preparing to open up the service for more people or even make it public for everyone. The phone numbers have been acquired by Google from Level 3, a backbone operator.
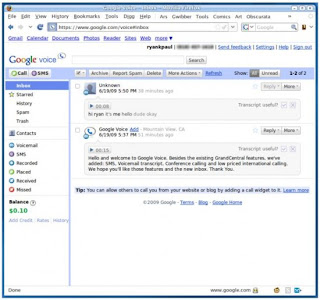


Other features include swithing to another line during a phone call or recording calls by pressing just one button. The voice records can then be listened too directly in the browser or downloaded as MP3 files.

Scheduling is another excellent features. The user can specify dates and hours when Google directs the calls to a phone number and in the rest of the time, the calls will be directed to another number. You can get your calls during workhours at your desk and during weekends at home, it’s just that easy.

The ListenIn features allows you to hear voicemails directly as they are recorded and answer to the phone call if you are interested. The service seems really good, even if it’s just in a beta phase, though I’m confident they will improve it a lot and add many more features. The feature that we know it’s lacking for the moment is recording outgoing calls.
Disable CD Autorun

1) Click Start, Run and enter GPEDIT.MSC


2) Go to Computer Configuration, Administrative Templates, System.

3) Locate the entry for Turn autoplay off and modify it as you desire.

Thursday, June 25, 2009

How to Convert FAT to NTFS file system

To convert a FAT partition to NTFS, perform the following steps.
Click Start, click Programs, and then click Command Prompt.

In Windows XP, click Start, click Run, type cmd and then click OK.

At the command prompt, type CONVERT [driveletter]: /FS:NTFS.
Convert.exe will attempt to convert the partition to NTFS.

NOTE: Although the chance of corruption or data loss during the conversion from FAT to NTFS is minimal, it is best to perform a full backup of the data on the drive that it is to be converted prior to executing the convert command. It is also recommended to verify the integrity of the backup before proceeding, as well as to run RDISK and update the emergency repair disk (ERD).
NTFS vs. FAT

To NTFS or not to NTFS—that is the question. But unlike the deeper questions of life, this one isn't really all that hard to answer. For most users running Windows XP, NTFS is the obvious choice. It's more powerful and offers security advantages not found in the other file systems. But let's go over the differences among the files systems so we're all clear about the choice. There are essentially three different file systems available in Windows XP: FAT16, short for File Allocation Table, FAT32, and NTFS, short for NT File System.


FAT16

The FAT16 file system was introduced way back with MS–DOS in 1981, and it's showing its age. It was designed originally to handle files on a floppy drive, and has had minor modifications over the years so it can handle hard disks, and even file names longer than the original limitation of 8.3 characters, but it's still the lowest common denominator. The biggest advantage of FAT16 is that it is compatible across a wide variety of operating systems, including Windows 95/98/Me, OS/2, Linux, and some versions of UNIX. The biggest problem of FAT16 is that it has a fixed maximum number of clusters per partition, so as hard disks get bigger and bigger, the size of each cluster has to get larger. In a 2–GB partition, each cluster is 32 kilobytes, meaning that even the smallest file on the partition will take up 32 KB of space. FAT16 also doesn't support compression, encryption, or advanced security using access control lists.

FAT32

The FAT32 file system, originally introduced in Windows 95 Service Pack 2, is really just an extension of the original FAT16 file system that provides for a much larger number of clusters per partition. As such, it greatly improves the overall disk utilization when compared to a FAT16 file system. However, FAT32 shares all of the other limitations of FAT16, and adds an important additional limitation—many operating systems that can recognize FAT16 will not work with FAT32—most notably Windows NT, but also Linux and UNIX as well. Now this isn't a problem if you're running FAT32 on a Windows XP computer and sharing your drive out to other computers on your network—they don't need to know (and generally don't really care) what your underlying file system is.

The Advantages of NTFS

The NTFS file system, introduced with first version of Windows NT, is a completely different file system from FAT. It provides for greatly increased security, file–by–file compression, quotas, and even encryption. It is the default file system for new installations of Windows XP, and if you're doing an upgrade from a previous version of Windows, you'll be asked if you want to convert your existing file systems to NTFS. Don't worry. If you've already upgraded to Windows XP and didn't do the conversion then, it's not a problem. You can convert FAT16 or FAT32 volumes to NTFS at any point. Just remember that you can't easily go back to FAT or FAT32 (without reformatting the drive or partition), not that I think you'll want to.
The NTFS file system is generally not compatible with other operating systems installed on the same computer, nor is it available when you've booted a computer from a floppy disk. For this reason, many system administrators, myself included, used to recommend that users format at least a small partition at the beginning of their main hard disk as FAT. This partition provided a place to store emergency recovery tools or special drivers needed for reinstallation, and was a mechanism for digging yourself out of the hole you'd just dug into. But with the enhanced recovery abilities built into Windows XP (more on that in a future column), I don't think it's necessary or desirable to create that initial FAT partition.

When to Use FAT or FAT32

If you're running more than one operating system on a single computer (see Dual booting in Guides), you will definitely need to format some of your volumes as FAT. Any programs or data that need to be accessed by more than one operating system on that computer should be stored on a FAT16 or possibly FAT32 volume. But keep in mind that you have no security for data on a FAT16 or FAT32 volume—any one with access to the computer can read, change, or even delete any file that is stored on a FAT16 or FAT32 partition. In many cases, this is even possible over a network. So do not store sensitive files on drives or partitions formatted with FAT file systems.
How to Rename the Recycle Bin

To change the name of the Recycle Bin desktop icon,

1. Click Start Goto Run


2. open Regedit and go to:

HKEY_CLASSES_ROOT/CLSID/{645FF040-5081-101B-9F08-00AA002F954E}


and change the name "Recycle Bin" to whatever you want (don't type any quotes).
Search For Hidden Or System Files In Windows XP

The Search companion in Windows XP searches for hidden and system files differently than in earlier versions of Windows. This guide describes how to search for hidden or system files in Windows XP.
Search for Hidden or System Files By default, the Search companion does not search for hidden or system files. Because of this, you may be unable to find files, even though they exist on the drive.
To search for hidden or system files in Windows XP:

1. Click Start, click Search, click All files and folders, and then click More
advanced options.

2. Click to select the Search system folders and Search hidden files and
folders
check boxes.


NOTE: You do not need to configure your computer to show hidden files in the Folder Options dialog box in Windows Explorer to find files with either the hidden or system attributes, but you need to configure your computer not to hide protected operating system files to find files with both the hidden and system attributes. Search Companion shares the Hide protected operating system files option (which hides files with both the system and hidden attributes) with the Folder Options dialog box Windows Explorer.

Wednesday, June 24, 2009

Set Permissions for Shared Files and Folders

Sharing of files and folders can be managed in two ways. If you chose simplified file sharing, your folders can be shared with everyone on your network or workgroup, or you can make your folders private. (This is how folders are shared in Windows 2000.) However, in Windows XP Professional, you can also set folder permissions for specific users or groups. To do this, you must first change the default setting, which is simple file sharing. To change this setting, follow these steps:

1. Open Control Panel, click Tools, and then click Folder Options.


2. Click the View tab, and scroll to the bottom of the Advanced Settings list.


3. Clear the Use simple file sharing (Recommended) check box.


4. To manage folder permissions, browse to the folder in Windows Explorer, right–click the
folder, and then click Properties. Click the Security tab, and assign permissions,
such as Full Control, Modify, Read, and/or Write, to specific users.


You can set file and folder permissions only on drives formatted to use NTFS, and you must be the owner or have been granted permission to do so by the owner.
Speed up your browsing of Windows 2000 & XP machines

Here's a great tip to speed up your browsing of Windows XP machines. Its actually a fix to a bug installed as default in Windows 2000 that scans shared files for Scheduled Tasks. And it turns out that you can experience a delay as long as 30 seconds when you try to view shared files across a network because Windows 2000 is using the extra time to search the remote computer for any Scheduled Tasks. Note that though the fix is originally intended for only those affected, Windows 2000 users will experience that the actual browsing speed of both the Internet & Windows Explorers improve significantly after applying it since it doesn't search for Scheduled Tasks anymore. Here's how :

Open up the Registry and go to :

1 . Go to Run


2 . HKEY_LOCAL_MACHINE/Software/Microsoft/Windows/Current
Version/Explorer/RemoteComputer/NameSpace


Under that branch, select the key :
{D6277990-4C6A-11CF-8D87-00AA0060F5BF}
and delete it.


This is key that instructs Windows to search for Scheduled Tasks. If you like you may want to export the exact branch so that you can restore the key if necessary.
This fix is so effective that it doesn't require a reboot and you can almost immediately determine yourself how much it speeds up your browsing processes.
Windows XP Installation

Step->1


Step->2


Step->3


Step->4


Step->5


Step->6


Step->7


Step->8


Step->9


Step->10


Step->11


Step->12


Step->13


Step->14


Step->15


Srep->16


Step->17


Step->18


Step->19


Step->20


Step->21


Step->22


Step->23


Step->24


Step->25


Step->26


Step->27


Step->28


Step->29


Step->30

How to Speed Up Slow Windows XP - Tips on Speeding Up Windows XP That is Slow

If you want to know how to speed up slow Windows XP, there are good news and bad news. The good news is that there are a thousand and one things that you can do with regards to how to speed up slow Windows XP. The bad news is that, the causes of Windows running slow can vary to a huge extent and it is sometimes very hard if not impossible for lay men to find the root of the issue. This article will look at some common causes as well as their solutions.

Too many unnecessary programs installed.

This is a very common issue and people trying to find out how to speed up slow Windows XP should first look at this aspect.

1. Start Go to the control panel and scroll through the list of programs, chances are you
will find some programs that you no longer need. Uninstall these.


Spywares.

With more and more browser tools like toolbars and free software downloads online now, this has become one of the most common causes of Windows slowing down. What happens is that when users install free software or toolbars for their browser, hidden programs may be installed and are kept running every time Windows starts. These take up memory resources. One spyware may not do much but when you have more of them, the effect is quite substantial. Download spyware removal tools like Spybots or Adware .

Unwanted files.

Cleaning up unwanted temp files, cookies, downloaded programs from browsing the web will help to address some of the issues on pertaining to how to speed up slow Windows XP. You can use the Windows Disk Cleanup tool to do this.

Open My Computer, right-click Local Disk, and then click Properties. On the General tab, click the Disk Cleanup button.

Corrupted or Unwanted Registry Entries

This will also happen over time. With the installing and uninstalling of software and device drivers, the Windows registry accumulates a lot of junk data overtime and this can affect the performance of Windows as it constantly refers to the registry for various tasks. Use a registry cleaner to remove junk entries.